
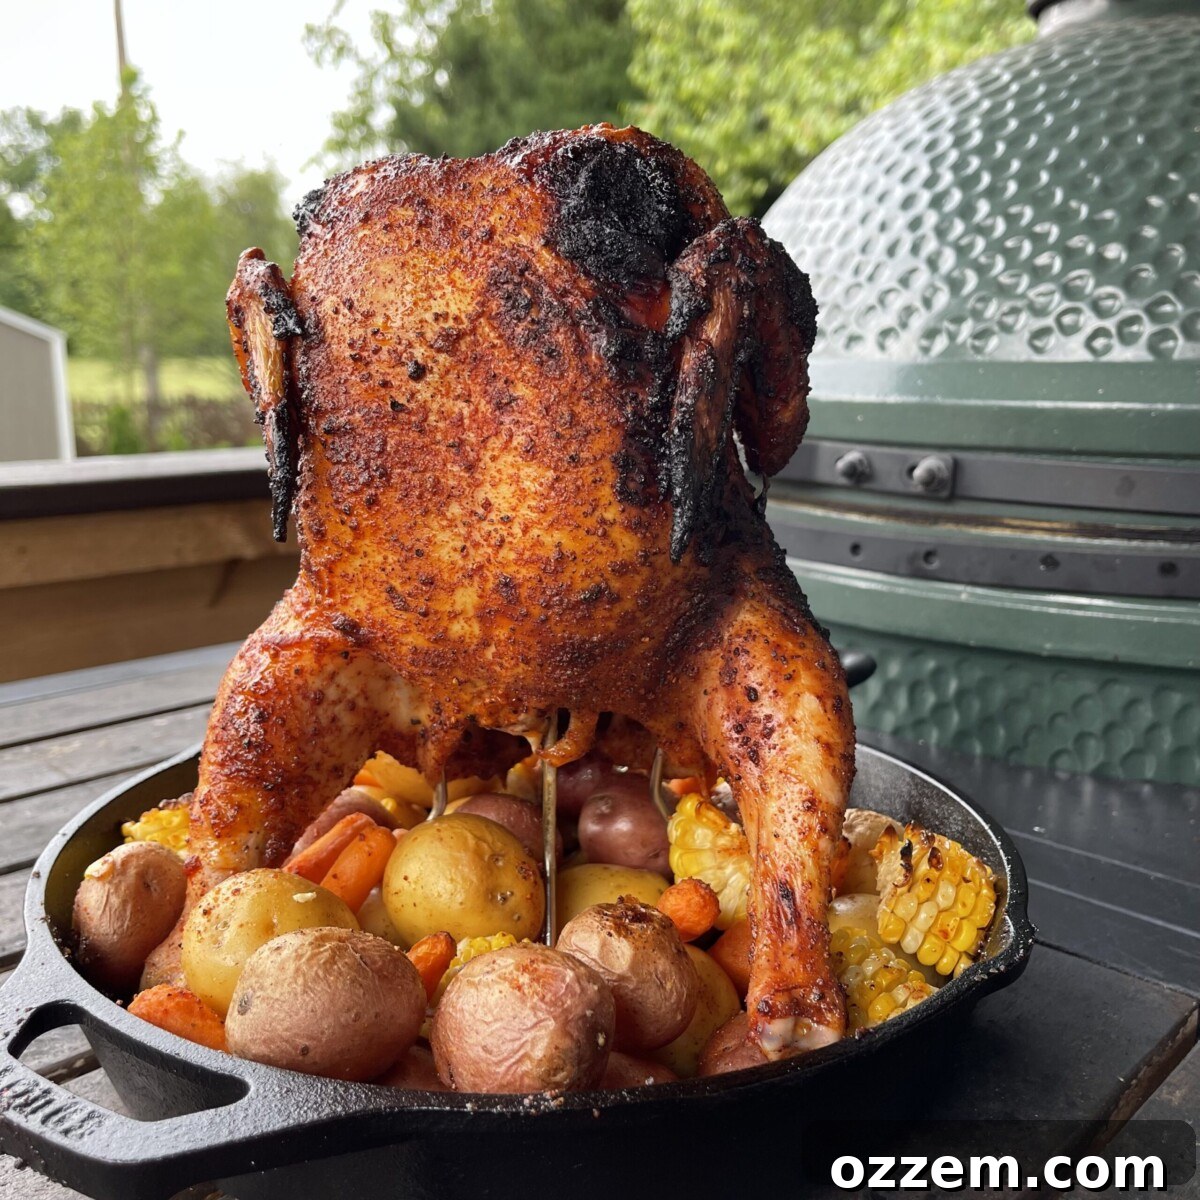
Easy Whole Grilled Chicken Dinner with Roasted Vegetables: Your Go-To One-Pan Recipe
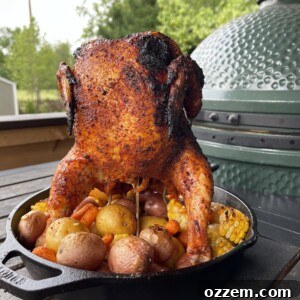
Winner, winner, chicken dinner! Prepare for a culinary triumph with this incredibly easy and flavorful whole grilled chicken dinner, perfectly complemented by a medley of vibrant roasted vegetables. Designed for busy weeknights yet impressive enough for any gathering, this one-pan wonder simplifies mealtime without compromising on taste. The secret to its cohesive deliciousness lies in grilling the chicken upright over a bed of seasoned potatoes and carrots, allowing the savory chicken juices to drip down and infuse the vegetables with rich flavor. It’s a complete meal that promises juicy chicken, tender veggies, and minimal cleanup, making it a staple in any home cook’s repertoire.
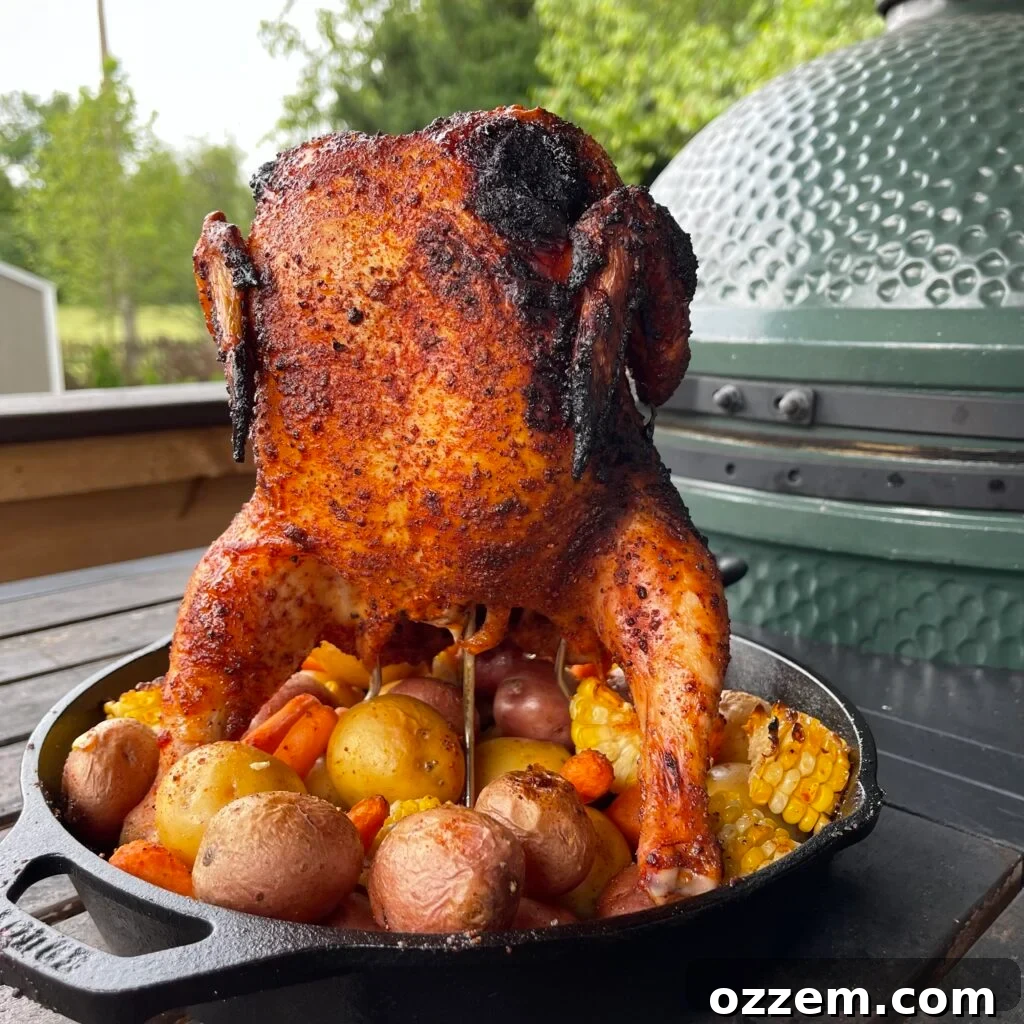
Table of Contents
- Why This Easy Chicken Dinner Will Become a Family Favorite
- Essential Ingredients for Your Perfect Grilled Chicken Dinner
- Preparing Your Veggies and Whole Chicken for Grilling
- Grilling Your One-Pan Chicken and Vegetables to Perfection
- Serving Suggestions and Delicious Variations
- Frequently Asked Questions
- Easy Grilled Chicken Dinner Recipe Card
- More Grilling Recipes You Might Enjoy
Why This Easy Chicken Dinner Will Become a Family Favorite
This recipe isn’t just about cooking a meal; it’s about creating an experience that simplifies your life and delights your palate. From its straightforward preparation to its mouth-watering results, here’s why this one-pan chicken dinner is destined for your regular rotation:
- Unbeatable Flavor Profile: The magic truly happens when the chicken roasts directly above the vegetables. As the chicken cooks, its savory juices naturally drip down, basting the potatoes, carrots, and corn, infusing them with an incredible depth of flavor that can’t be replicated any other way. Each bite is a harmonious blend of smoky, savory, and perfectly seasoned goodness.
- Effortless Weeknight Solution: Forget juggling multiple pots and pans. This entire meal comes together in a single cast iron skillet (or an oven-safe roasting pan), dramatically cutting down on cleanup time. The prep is minimal, and the cooking process is largely hands-off, allowing you to focus on other tasks or simply relax.
- Highly Versatile and Customizable: This recipe is a fantastic canvas for your creativity. Not a fan of carrots? Swap them for bell peppers, zucchini, or asparagus. Want a different flavor profile? Experiment with various BBQ rubs, herbs, or citrus notes. It’s incredibly forgiving and adaptable, ensuring you can repeat it multiple times a week without boredom.
- Nutritious and Wholesome: Featuring a lean protein source like whole chicken alongside a hearty portion of fresh, nutrient-rich vegetables, this meal is a balanced and healthy choice for the entire family. You control the ingredients, ensuring a wholesome dinner free from artificial additives.
- Crowd-Pleasing Appeal: There’s something universally satisfying about a perfectly roasted whole chicken. Combined with comforting, tender vegetables, this dish is a guaranteed hit with both kids and adults. Everyone gets their favorite cut of chicken, and the shared skillet presentation adds a rustic, inviting touch to your dining table.
Essential Ingredients for Your Perfect Grilled Chicken Dinner
To achieve the best results for this delightful one-pan grilled chicken and vegetable dinner, selecting quality ingredients is key. Here’s a breakdown of what you’ll need and some tips for choosing them:
- Whole Chicken (approx. 3-4 lbs): A fresh, high-quality whole chicken is the star of this dish. Look for one that is plump and has healthy-looking skin. A 3-4 lb bird is ideal for cooking evenly and feeding a family of four. Ensure it’s fully thawed if frozen.
- Your Favorite BBQ Rub (4 tbsp): This is where you infuse personality into your chicken! A good BBQ rub will provide a flavorful crust and complement the smoky notes from the grill. We highly recommend Hardcore Carnivore Sweet Rub for its balanced blend of sweet and savory spices. Feel free to use your own homemade rub or another preferred brand.
- Olive Oil (1/2 cup): Essential for coating the vegetables, preventing them from sticking, and promoting beautiful caramelization. Extra virgin olive oil adds a lovely flavor, but any good quality olive oil will do.
- Kosher Salt (1 tbsp) & Freshly Ground Black Pepper: Basic seasonings that enhance the natural flavors of both the chicken and vegetables. Adjust amounts to your personal preference.
- Petite Red Potatoes (12 oz) & Petite Gold Potatoes (12 oz): Using a mix of red and gold petite potatoes adds visual appeal and a slight variation in texture. Their smaller size means they cook quickly and evenly. Halve or quarter them depending on size to ensure consistent cooking.
- Baby Carrots (12 oz): These sweet, tender carrots require minimal prep and add a lovely pop of color and sweetness. If using larger carrots, peel and chop them into 1-inch pieces.
- Corn on the Cob (2 ears) or Frozen Corn (2 cups): Fresh corn on the cob, chopped into 1-inch pieces, adds a wonderful texture and natural sweetness. If fresh isn’t available, high-quality frozen corn works just as well; simply add it directly to the pan with the other vegetables.
- Garlic Cloves (4, minced or roughly chopped): Fresh garlic is non-negotiable for its aromatic punch. Minced garlic will distribute more evenly, but roughly chopped cloves will mellow and become sweet as they roast.
Preparing Your Veggies and Whole Chicken for Grilling
Efficient preparation is the first step to a flawless grilled chicken dinner. Follow these steps to ensure both your vegetables and chicken are perfectly seasoned and ready for the grill:
Step 1: Get Your Vegetables Ready
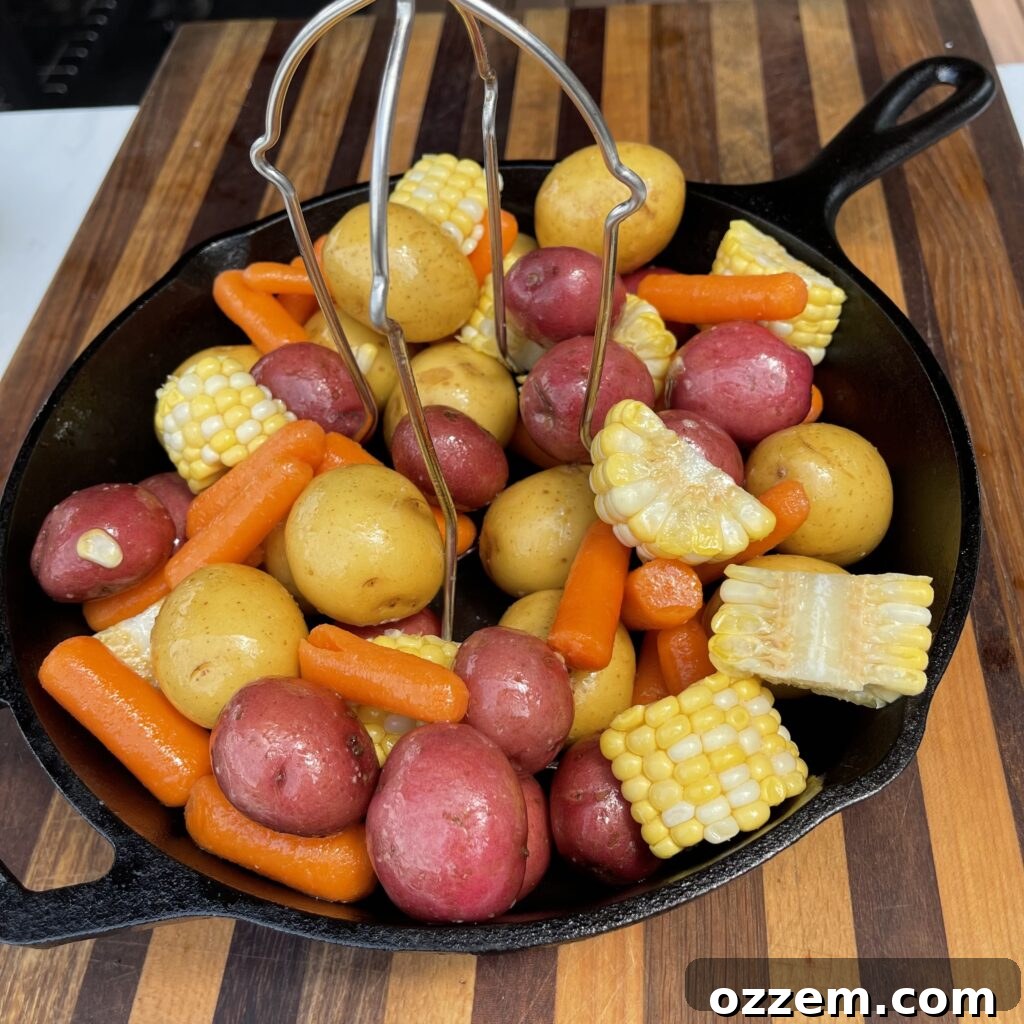
In a spacious mixing bowl, combine your selection of prepared vegetables: the halved petite red potatoes, quartered petite gold potatoes, baby carrots, and chopped corn. Add the minced garlic cloves for a burst of aromatic flavor. Now, drizzle a generous amount of olive oil over the vegetables, ensuring every piece gets a light coating. Season generously with kosher salt and freshly ground black pepper. Use your hands or a large spoon to toss everything together thoroughly until the vegetables are uniformly coated with oil and seasoning. This ensures even cooking and maximum flavor absorption.
Step 2: Assemble the Pan
Carefully pour the seasoned vegetable medley into a large, sturdy cast iron skillet. A 12-inch skillet is usually ideal for a 3-4 lb chicken and sufficient vegetables. Spread the vegetables out evenly across the bottom of the pan, creating a slight well in the center. This is where your chicken stand will go. If you don’t have a cast iron skillet, any oven-safe roasting pan will work, though the cast iron helps create a beautiful crust on the potatoes.
Step 3: Prepare the Whole Chicken
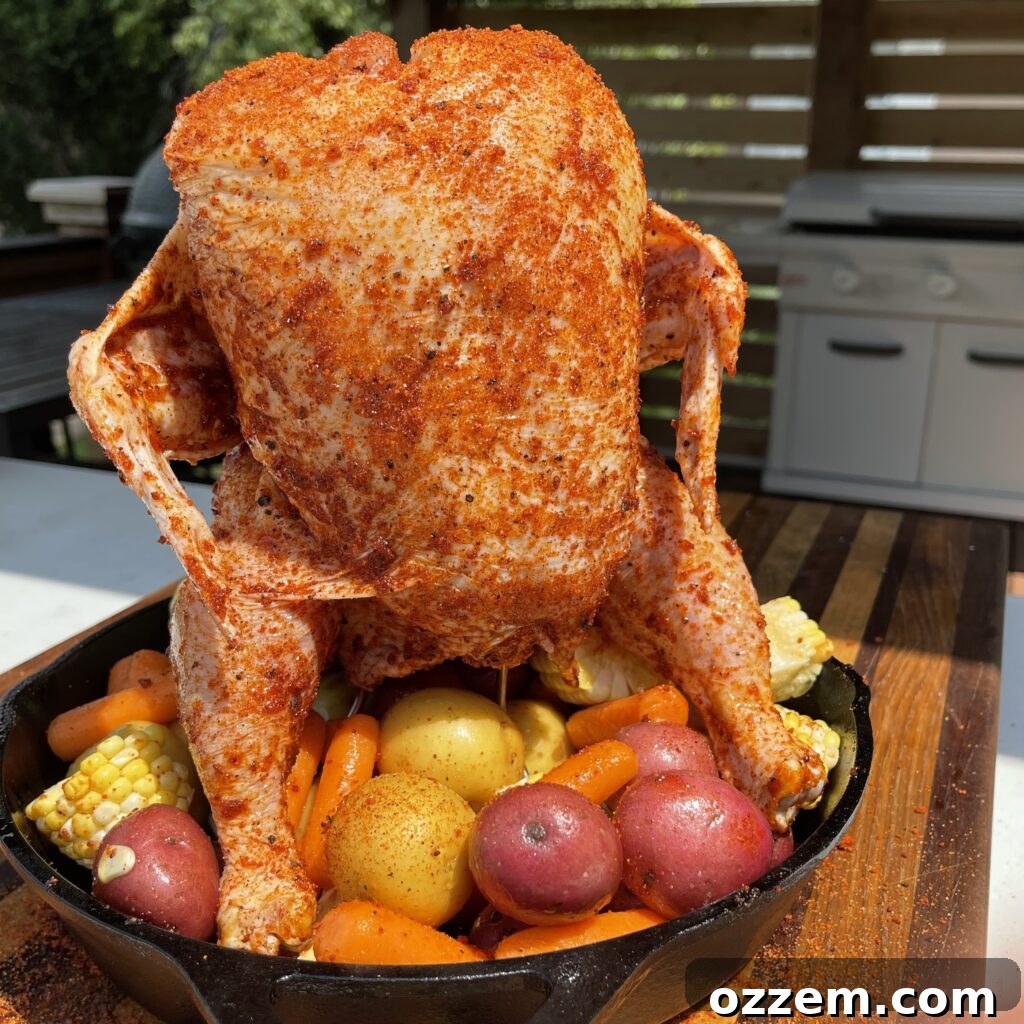
Now, it’s time to prep the star of the show! Begin by patting your whole chicken thoroughly dry with paper towels. This crucial step removes excess moisture from the skin, which is essential for achieving that coveted crispy, golden-brown crust. Next, generously apply your chosen BBQ rub over the entire surface of the bird. Don’t forget to get it under the wings, on the drumsticks, and even inside the cavity for maximum flavor penetration. The goal is an even, generous coating that will build an incredible bark during grilling. For this recipe, we used Hardcore Carnivore Sweet Rub, but your favorite blend will work perfectly.
Step 4: Position the Chicken on the Stand
Carefully insert the seasoned whole chicken onto the chicken stand, if you are using one. Ensure the chicken is stable and pushed down as far as it can go onto the stand. This vertical positioning allows for excellent air circulation, ensuring even cooking and promoting incredibly crispy skin all around. It also strategically places the chicken so its juices can drip directly onto the vegetables below, enriching their flavor. Once the chicken is securely on the stand, place the stand with the chicken firmly in the well you created in the center of the vegetable-filled cast iron skillet.
Grilling Your One-Pan Chicken and Vegetables to Perfection
The grill is where the magic happens, transforming simple ingredients into a deeply flavorful meal. Achieving a perfectly grilled whole chicken with tender, juicy results requires a few key steps:
Step 1: Set Up Your Grill for Indirect Heat
Preheating your grill correctly is paramount. You’ll want to set it up for indirect heat, aiming for a consistent temperature of 350°F (175°C). For gas grills, this typically means turning on burners on one side (or both outer burners) and placing your skillet over the unlit burners. For charcoal grills, arrange the hot coals around the perimeter of the grill, creating a void in the center where your skillet will sit. This indirect cooking method prevents the chicken skin from burning while allowing the interior to cook thoroughly and evenly, ensuring juiciness.
Step 2: Place the One-Pan Dinner on the Grill
Once your grill reaches the target temperature and is set for indirect heat, carefully place the cast iron skillet, with the chicken and vegetables, onto the indirect heat zone. Close the grill lid to allow the heat to circulate and roast the chicken and vegetables. Keep a close eye on the grill temperature, adjusting vents or burners as needed to maintain that steady 350°F (175°C).
Step 3: Roast Until Perfectly Cooked
Allow the chicken and vegetables to roast for approximately 45 minutes to 1 hour and 15 minutes. The exact cooking time will vary depending on the size of your chicken and the consistency of your grill’s temperature. The most crucial part of this step is monitoring the internal temperature of the chicken. Using a reliable meat thermometer, insert it into the thickest part of the thigh, making sure not to touch any bone. The chicken is fully cooked and safe to eat when it reaches an internal temperature of 165°F (74°C). The vegetables should be tender, slightly caramelized, and infused with the delicious chicken drippings. You might need to gently stir the vegetables halfway through cooking to ensure even roasting, but avoid disturbing the chicken on its stand.
Step 4: Rest and Serve
Once the chicken reaches the desired internal temperature, carefully remove the cast iron skillet from the grill. This next step is perhaps the most important for ensuring a juicy bird: resting. Loosely tent the skillet with aluminum foil and allow the chicken to rest for 10-15 minutes. This resting period allows the juices within the chicken to redistribute throughout the meat, rather than running out immediately when carved. The result is a much more moist, tender, and flavorful chicken. After resting, carefully remove the chicken from the stand (if used), carve it into desired pieces, and serve immediately alongside the perfectly roasted vegetables. Enjoy this easy, flavorful, and complete meal!
Serving Suggestions and Delicious Variations
This Easy Whole Grilled Chicken Dinner is a complete meal in itself, but a few additions or tweaks can elevate the experience even further. Get creative and make it truly your own!
Serving Suggestions:
- Fresh Herbs: A sprinkle of fresh chopped parsley, chives, or cilantro over the finished dish adds a burst of color and fresh flavor.
- Citrus Wedge: Serve with lemon or lime wedges for a bright, zesty finish that complements the rich chicken.
- Simple Salad: A light, crisp green salad with a vinaigrette dressing provides a refreshing contrast to the hearty main course.
- Crusty Bread: A side of warm, crusty bread is perfect for soaking up any leftover savory juices from the skillet.
- Homemade Sauce: A drizzle of a simple pan sauce made from the skillet drippings (after deglazing with a splash of broth or wine) can add another layer of gourmet flavor.
Recipe Variations:
- Vegetable Medley Swaps:
- Seasonal Favorites: Replace or add vegetables like broccoli florets, cauliflower, zucchini, bell peppers (any color), asparagus spears, or green beans. Adjust cooking times as necessary for different vegetables; denser ones like sweet potatoes will need more time, while softer ones like zucchini might be added halfway through.
- Root Vegetable Focus: Experiment with parsnips, turnips, or even whole peeled shallots for a different earthy flavor.
- Herb and Spice Infusions:
- Mediterranean Twist: Add fresh rosemary, thyme, and oregano to the vegetables, and perhaps some pitted Kalamata olives.
- Spicy Kick: Incorporate a pinch of cayenne pepper, smoked paprika, or a dash of hot sauce into your BBQ rub for those who enjoy a bit of heat.
- Garlic Lover’s Dream: Increase the amount of garlic or add whole unpeeled garlic cloves to the vegetables; they’ll roast to a sweet, buttery consistency.
- Brining for Extra Juiciness: For an exceptionally moist and flavorful chicken, consider brining it for a few hours (or even overnight) before applying the rub. A simple saltwater brine can make a significant difference, especially for larger birds.
- Citrus or Aromatic Cavity Stuffing: Before applying the rub, place half a lemon, an onion quarter, or fresh herbs (like rosemary sprigs) inside the chicken cavity. This adds internal flavor and moisture as the chicken roasts.
- Different Rubs and Marinades: Explore different types of BBQ rubs – savory, spicy, herby, or citrusy. Alternatively, you could marinate the chicken for a few hours before grilling for an even deeper flavor penetration.
Frequently Asked Questions
Absolutely! While this recipe truly shines on the grill, harnessing that smoky flavor and crispy skin, it can be easily replicated in a conventional oven. To adapt for the oven, preheat it to 375°F (190°C). Place your skillet with the chicken and vegetables into the preheated oven and roast for approximately 1.5 to 2 hours, or until the chicken reaches an internal temperature of 165°F (74°C) in the thickest part of the thigh. If you don’t have a chicken stand, you can lay the chicken directly on top of the vegetables in a large roasting pan. While a stove top alone won’t achieve the roasted effect for a whole chicken, you could brown the chicken on the stove top in the skillet first, then transfer it to the oven with the vegetables to finish cooking.
You absolutely do not need a specialized grill like a Big Green Egg or a Weber grill to achieve fantastic results with this recipe. Any grill that can maintain a consistent indirect heat will work wonderfully. This includes standard gas grills, charcoal grills, or even ceramic smokers. The key is setting up your heat source correctly (coals to the side for charcoal, unlit burners under the food for gas) and using a reliable thermometer to monitor the grill’s ambient temperature to ensure it stays around 350°F (175°C). The Big Green Egg offers excellent heat retention and a subtle smoky flavor, but the essence of this recipe is adaptable to what you have.
Preventing dry chicken is all about proper technique. Firstly, generously seasoning your chicken with a good rub helps to form a crust that locks in moisture. Secondly, cooking at a consistent, indirect temperature is crucial; high direct heat will dry out the chicken’s exterior before the interior is cooked. Most importantly, use a reliable meat thermometer to avoid overcooking. Aim for an internal temperature of 165°F (74°C) in the thickest part of the thigh (avoiding the bone). Remove the chicken from the heat as soon as it reaches this temperature. Finally, always allow the chicken to rest for 10-15 minutes after cooking. This allows the muscle fibers to relax and reabsorb the juices, ensuring a supremely moist and tender result.
Yes, absolutely! Preparing the vegetables in advance is a great time-saving trick, especially for busy weeknights. You can chop all your potatoes, carrots, and corn, then combine them in a bowl with the olive oil, salt, pepper, and garlic. Toss them thoroughly, cover the bowl tightly with plastic wrap, and refrigerate for up to 24 hours. When you’re ready to cook, simply take the vegetables out, give them another quick toss, and assemble the skillet with the chicken. This pre-prep ensures you have a quick and easy meal ready to go when dinner time approaches.
A chicken stand, often referred to as a “beer can chicken roaster” (though you don’t use a beer can in this specific recipe), is a device that holds a whole chicken upright during cooking. While not strictly necessary—you could simply lay the chicken on its back in the pan—it significantly enhances the cooking process for this recipe. Standing the chicken upright allows heat to circulate more evenly around the entire bird, promoting incredibly crispy skin on all sides. More importantly for this one-pan dish, it positions the chicken so that all its flavorful juices drip directly down onto the vegetables roasting below, infusing them with rich, savory taste and helping to create that cohesive, delicious flavor profile.
Easy Grilled Chicken Dinner Recipe Card
Get ready to cook this incredible one-pan meal with our detailed recipe card below!
Easy Grilled Chicken Dinner
Maciek Zurawski
15
1
4 People
Ingredients
- 1 Whole Chicken (approx. 3-4 lbs)
- 4 tbsp Your favorite BBQ rub (e.g., Hardcore Carnivore Sweet Rub)
- 1/2 cup Olive oil
- 1 tbsp Kosher Salt (or to taste)
- 12 oz Petite red potatoes, halved or quartered
- 12 oz Petite gold potatoes, halved or quartered
- 12 oz Baby carrots
- 2 Ears of corn on the cob, chopped into 1-inch pieces (or 2 cups frozen corn)
- 4 Garlic cloves, minced or roughly chopped
- Freshly ground black pepper, to taste
Instructions
-
Prepare the Vegetables: In a large mixing bowl, combine the halved potatoes (red and gold), baby carrots, chopped corn, and minced garlic cloves. Drizzle generously with olive oil and sprinkle with kosher salt and freshly ground black pepper. Toss everything together until the vegetables are evenly coated.
-
Assemble the Pan: Pour the seasoned vegetables into a large cast iron skillet (or an oven-safe roasting pan). If using a chicken stand, wedge it securely in the center of the pan, creating a well for the chicken.
-
Season the Chicken: Pat the whole chicken dry with paper towels. This helps achieve crispy skin. Generously apply your favorite BBQ rub over the entire surface of the bird, ensuring every nook and cranny, including the cavity, is coated. Don’t be shy with the rub – it’s where much of the flavor comes from!
-
Position the Chicken: Carefully insert the seasoned whole chicken onto the chicken stand, ensuring it is stable and pushed down as far as it can go. If not using a stand, place the chicken directly on top of the vegetables in the skillet.
-
Preheat Your Grill (or Oven): Set up your grill for indirect heat at a steady temperature of 350°F (175°C). For gas grills, this usually means turning off the burner directly under the skillet. For charcoal grills, push the coals to the sides. If using an oven, preheat to 375°F (190°C).
-
Grill/Roast to Perfection: Place the skillet with the chicken and vegetables on the indirect heat section of your grill (or into the preheated oven). Roast for approximately 45 minutes to 1 hour and 15 minutes, or until the chicken reaches an internal temperature of 165°F (74°C) when measured in the thickest part of the thigh, without touching the bone. The vegetables should be tender and slightly caramelized.
-
Rest and Serve: Once cooked, carefully remove the skillet from the grill or oven. Let the chicken rest for 10-15 minutes before carving. This crucial step allows the juices to redistribute throughout the meat, ensuring a supremely moist and flavorful result. Carve the chicken, serve alongside the roasted vegetables, and enjoy your delicious homemade meal!
Nutrition (Estimated Per Serving)
Carbohydrates: 45g |
Protein: 43g |
Fat: 57g |
Saturated Fat: 12g |
Polyunsaturated Fat: 9g |
Monounsaturated Fat: 32g |
Trans Fat: 0.2g |
Cholesterol: 148mg |
Sodium: 488mg |
Potassium: 1494mg |
Fiber: 7g |
Sugar: 9g |
Vitamin A: 12092IU |
Vitamin C: 33mg |
Calcium: 79mg |
Iron: 4mg
More Grilling Recipes You Might Enjoy
Beef
Sizzling Steak and Shrimp Dinner: A Perfect Pair
Pork
Hearty Pork Chops in Rich Beer Gravy
Chicken & Turkey
Zesty Roasted Citrus Chicken: A Bright & Flavorful Meal
For even more delicious grilling and cooking ideas to inspire your next meal, be sure to explore our full Recipes Page.